# Self-Registering Clients via REST API
The REST API registration method enables advanced client configuration during the self-registration process. With this method, clients (e.g. agents) can include additional information, such as context details, role requests, permission specifications, and certificate signing requests (CSRs), in their registration payload.
{% hint style="warning" %}
When using certificate signing requests (CSR), the Common Name (CN) in the CSR must match the username in the payload and must not be empty. Otherwise, the request will be rejected.
{% endhint %}
{% hint style="info" %}
The username must follow the Connectware username requirements. The password must be at least five characters long.
{% endhint %}
## Registration Workflow
The client self-registration process via REST API follows these steps:
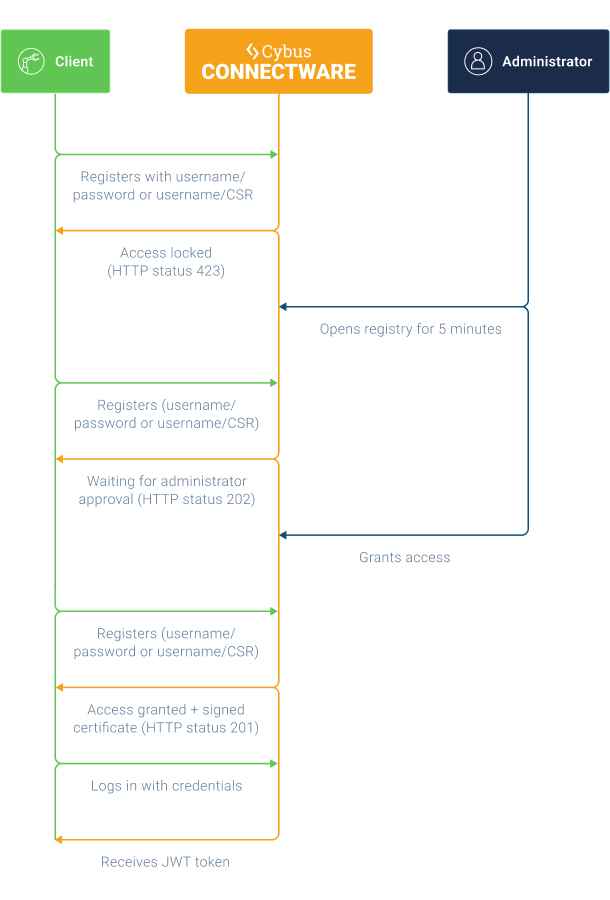
Registering clients in Connectware via REST API
1. The client sends an initial registration request to Connectware with credentials and optionally requested roles and permissions.
2. If the registry endpoint is locked (default), Connectware returns a `423 Locked` response.
3. The Connectware administrator unlocks the registry endpoint for five minutes.
4. The client resends the registration request and receives a `202 Accepted` (pending) response.
5. The client polls at regular intervals by resending the same request.
6. The Connectware administrator reviews and approves the pending request.
7. Upon the next poll, the client receives a `201 Created` response indicating successful registration.
8. If the registration used a CSR, the signed certificate is included in the response.
9. The client can now authenticate using standard mechanisms.
## Initiating the Self-Registration (Client)
{% hint style="info" %}
This section is for clients that want to initiate the self-registration.
{% endhint %}
**Prerequisite**
* The registration API must be unlocked by a Connectware administrator.
**Initiating the Self-Registration**
* To initiate the self-registration, the client sends a `POST` request to the `/api/client-registry/register` endpoint. The client can include context details, role requests, permission specifications, and certificate signing requests (CSRs) with its registration via the API parameters.
**Example for HTTP clients**
* Example with username, password, and context.
{% code lineNumbers="true" %}
```bash
curl --insecure --location https://localhost/api/client-registry/register --header 'Content-Type: application/json' --data-raw '{
"username": "sensor-0003",
"password": "3f9a7b2cTe!rRTt56fT",
"context": "Temperature sensor for line 53c"
}
```
{% endcode %}
* Example with username, password, role, and context.
{% code lineNumbers="true" %}
```bash
curl --insecure --location https://localhost/api/client-registry/register --header 'Content-Type: application/json' --data-raw '{
"username": "sensor-0003",
"password": "3f9a7b2cTe!rRTt56fT",
"roles": ["minimum"],
"context": "Serial number 35350"
}
```
{% endcode %}
For detailed information about the Client Registry REST API parameters, see [Auth-Server API](https://docs.cybus.io/2-0-6/reference/api-reference/api-definition).
### Required and Optional Parameters
* Either a `password` or a `csr` (certificate signing request) must be provided — but not both.
* `roles` and `permissions` define the access permissions that the client is requesting.
* `context` provides optional metadata to help administrators identify the source or purpose of the request.
### Possible Responses
| Status Code | Meaning |
| -------------------------- | ------------------------------------------------------ |
| `201 Created` | Registration granted; the client can now authenticate. |
| `202 Accepted` | Registration is pending admin approval. |
| `400 Bad Request` | Malformed or incomplete request. |
| `409 Conflict` | Username already exists or request is duplicated. |
| `422 Unprocessable Entity` | Username or password violates policy requirements. |
| `423 Locked` | Registration endpoint is currently locked. |
## Approving Self-Registration Requests (Admin)
{% hint style="info" %}
This section is for Connectware admins that want to approve a self-registration request.
{% endhint %}
After a client attempts registration, the Connectware admin must approve the request before the client can access the system.
### Approving Self-Registration Requests via REST API
* To approve self-registration requests via REST API, refer to the `Confirm a single authentication request` parameter documented in the [Auth-Server API](https://docs.cybus.io/2-0-6/reference/api-reference/api-definition).
### Approving Self-Registration Requests via Admin UI
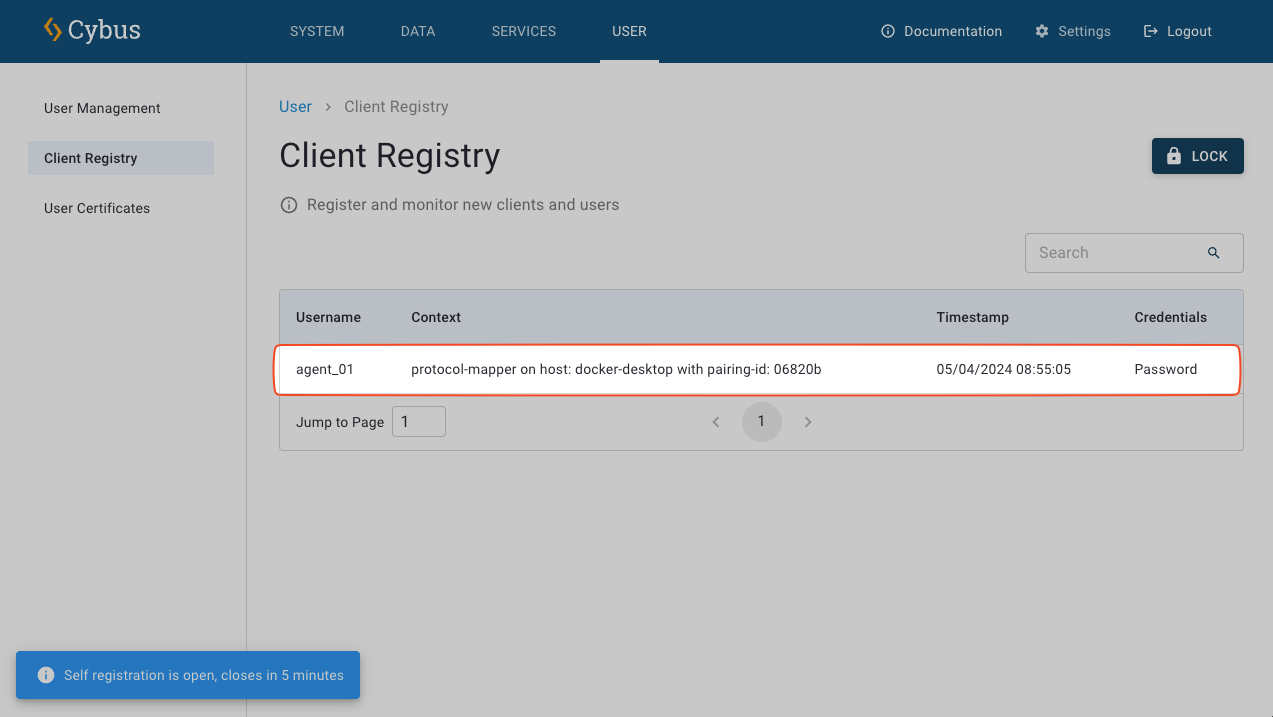
1. In the [Client Registry View](https://docs.cybus.io/2-0-6/documentation/client-registry/client-registry-view), click the **Unlock** button to temporarily unlock the self-registration. The registry will remain open for five minutes and will automatically lock again after this period. You can manually lock the registry by clicking the **Lock** button.
2. Locate the pending client request in the table.
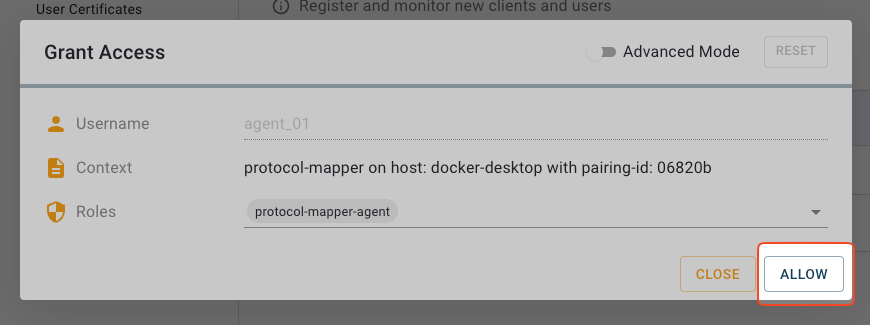
3. Click the registration request in the list to open the **Grant Access** dialog.
4. In the **Grant Access** dialog, inspect the client request details, then click **Allow** to approve the registration.
5. In the navigation panel, click **User** and verify that the newly created user appears in the users list.