# Self-Registering MQTT Clients
The MQTT client self-registration via authentication attempt process allows you to securely add new MQTT clients to Connectware via self-registration without having to handle passwords manually. This method works with any standard MQTT client and requires minimal configuration because clients generate their own passwords during registration.
{% hint style="warning" %}
New users created through this process have no permissions by default. Administrators must explicitly assign appropriate permissions after registration is complete.
For registering clients including additional information, such as context details, role requests, permission specifications, and certificate signing requests (CSRs), in their registration payload, see [Client Self-Registration via REST API](https://docs.cybus.io/2-0-6/documentation/client-registry/self-registering-clients-via-rest-api).
{% endhint %}
{% hint style="info" %}
The username must follow the Connectware username requirements. The password must be at least five characters long or must adhere to the [Password Policy Configuration](https://docs.cybus.io/2-0-6/documentation/security/password-policy-configuration).
{% endhint %}
## Registration Workflow
The MQTT client self-registration process via authentication attempt follows these steps:
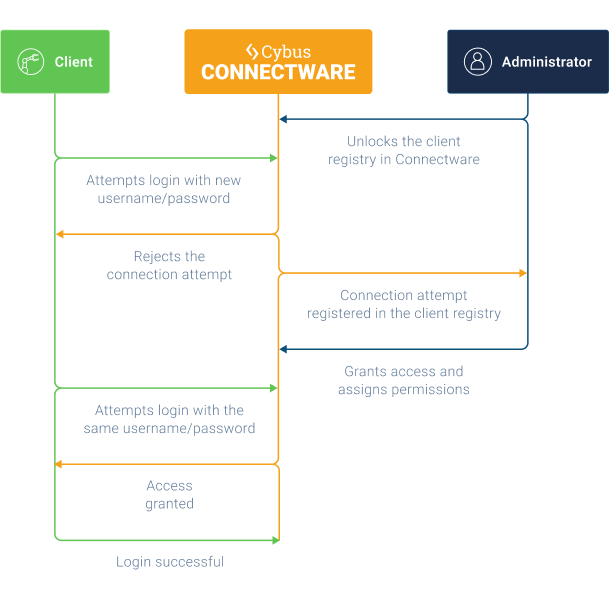
Registering MQTT clients in Connectware
1. The Connectware administrator unlocks the Client Registry from the **Client Registry View**.
2. An MQTT client attempts to connect using credentials for a non-existent user.
3. Connectware logs the attempt, rejects the request, and creates a pending registration entry.
4. The administrator reviews and approves the registration in the **Client Registry View**.
5. Connectware creates a user with the provided credentials.
6. The administrator assigns roles or permissions to the new user.
7. The MQTT client reconnects with the same credentials and successfully authenticates.
## Initiating the Self-Registration (MQTT Client)
{% hint style="info" %}
This section is for MQTT clients that want to initiate the self-registration.
{% endhint %}
**Prerequisite**
* The Client Registry must be unlocked by a Connectware administrator.
**Initiating the Self-Registration**
* To initiate the self-registration, the MQTT client must attempt to connect using basic authentication (username/password).
**Example**
{% code lineNumbers="true" %}
```bash
mosquitto_pub -h -p 1883 -u "" -P "" -i "" -t "devices/sensor3/data" -m "temperature"
```
{% endcode %}
**Once the request is initiated**
1. The MQTT client receives an authentication error.
2. Connectware logs the credentials as a pending registration.
3. A Connectware admin must now review and approve the request.
4. After approval, the MQTT client retries with the same credentials and successfully connects.
{% hint style="info" %}
Client access is limited until the administrator assigns roles or specific permissions.
{% endhint %}
## Approving Self-Registration Requests (Admin)
{% hint style="info" %}
This section is for Connectware admins that want to approve a self-registration request.
{% endhint %}
After an MQTT client attempts registration, the Connectware admin must approve the request before the client can access the system.
### Approving Self-Registration Requests via REST API
* To approve self-registration requests via REST API, refer to the `Confirm a single authentication request` parameter documented in the [Auth-Server API](https://docs.cybus.io/2-0-6/reference/api-reference/api-definition).
### Approving Self-Registration Requests via Admin UI
To approve the self-registration requests via the Admin UI, do as follows:
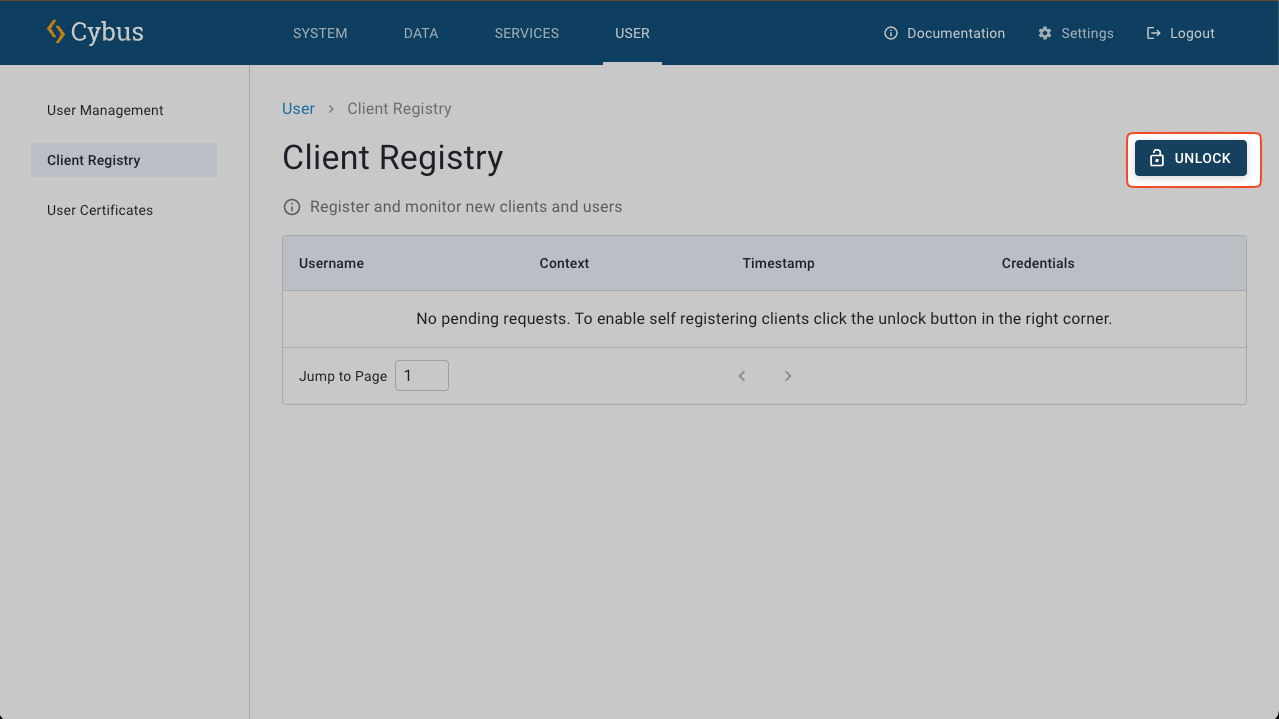
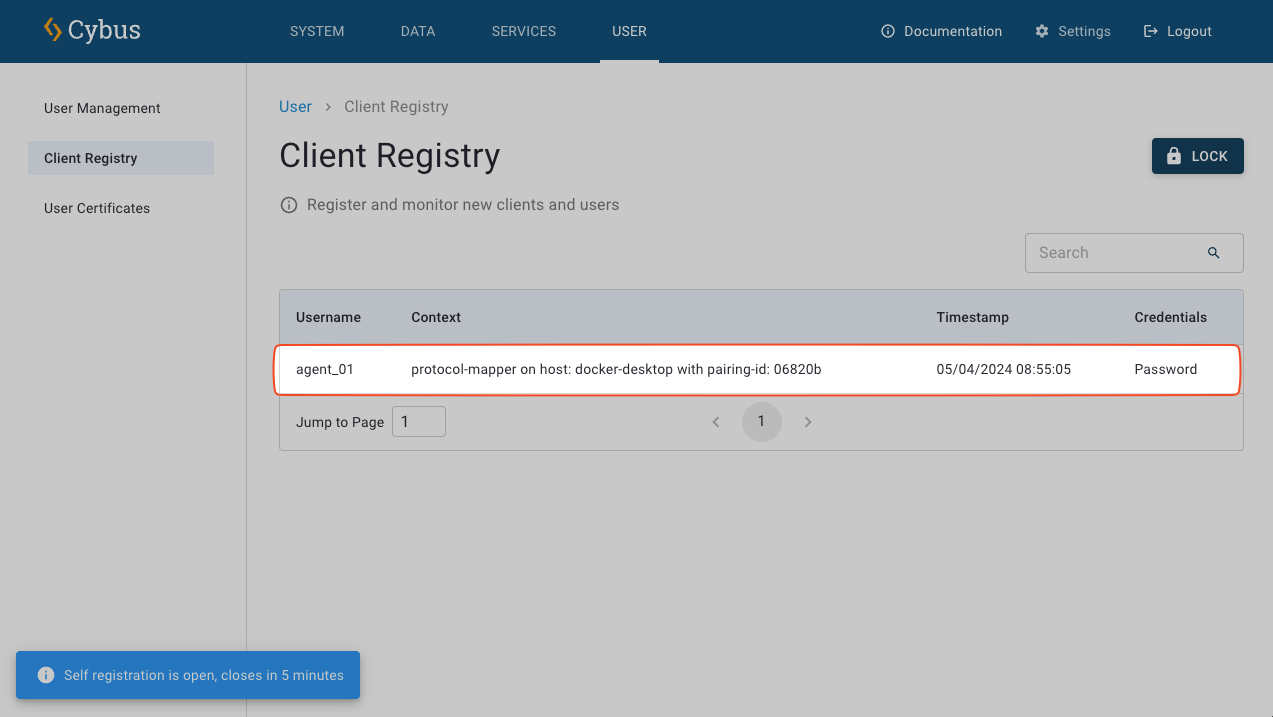
1. In the [Client Registry View](https://docs.cybus.io/2-0-6/documentation/client-registry/client-registry-view), click the **Unlock** button to temporarily unlock the self-registration. The registry will remain open for five minutes and will automatically lock again after this period. You can manually lock the registry by clicking the **Lock** button.
2. Locate the pending registration request in the registry table.
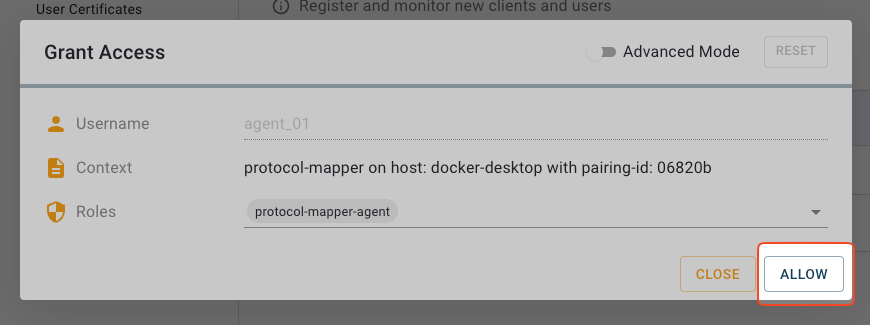
3. Click the request to open the **Grant Access** dialog.
4. Review the request details and click **Allow** to approve registration.
5. In the navigation panel, click **User** and confirm that the new user appears in the list.
6. Assign appropriate roles or permissions. For more information, see [Adding Roles to Users](https://docs.cybus.io/2-0-6/user-management/users#adding-roles-to-users).