# Connecting an MQTT Client to Publish & Subscribe Data
This guide explains how to connect MQTT clients to the Connectware MQTT broker to publish and subscribe to data. It covers the integration of MQTT clients with Connectware, including:
* Creating client credentials and permissions
* Using the client registration feature
* Establishing a connection with a client
* Publishing data
* Subscribing to data
## Prerequisites
To follow this guide, you will need the following:
* A running instance of Cybus Connectware.
* Access to the [Admin UI](https://docs.cybus.io/2-0-6/getting-started/admin-ui) with sufficient [user permissions](https://docs.cybus.io/2-0-6/documentation/user-management).
* Basic knowledge of MQTT.
## Choosing Your MQTT Client
In this guide, we use several MQTT clients, each serving a different purpose.
### Mosquitto
Mosquitto is an open-source message broker that includes command-line MQTT clients: `mosquitto_pub` and `mosquitto_sub`. These are useful for testing and troubleshooting, either manually or via scripts.
### MQTT Explorer
MQTT Explorer is an open-source MQTT client with a graphical user interface. It allows you to configure connections, create subscriptions, and publish to topics. The program presents data clearly and enables you to select which data to monitor, hide, or export. It also provides tools to decode message payloads, execute scripts, and track broker status.
### MQTT.fx
MQTT.fx is another graphical MQTT client. It provides an interface for connecting to brokers, publishing messages, and subscribing to topics. While MQTT Explorer is more feature-rich in terms of visualization and data inspection, MQTT.fx offers a simpler interface that many users find intuitive. In this guide, we use MQTT.fx alongside MQTT Explorer to demonstrate publishing and subscribing with different client tools.
### Node-RED Workbench
The [Node-RED Workbench](https://docs.cybus.io/2-0-6/documentation/node-red-workbench) is part of Connectware. It is a flow-based visual programming tool (based on Node-RED) for creating data flows and preprocessing data within Connectware. The Workbench provides MQTT publish and subscribe nodes, allowing you to build applications for prototyping or debugging. It also offers many other useful functions, such as creating dashboards.
## Creating Credentials in Connectware
To connect users to Connectware, you need to create credentials for authorization. There are two ways to create credentials:
* Manual registration via the [Users View dialog](https://docs.cybus.io/2-0-6/documentation/user-management/users) in the Connectware Admin UI.
* Self-registration via the [Client Registry](https://docs.cybus.io/2-0-6/documentation/client-registry).
### Creating Client Credentials and Permissions
1. On the navigation panel, click **User**.
2. Click **Add User** to open the **Create User** dialog.
3. In the **Create User** dialog, enter the **Username** and **Password**. For this example, we create the following users. The user for our Mosquitto client will be created in the following section using the client registration feature.
Before a user can access an MQTT topic, the user must be granted `read`, `write`, or `readWrite` permissions. These are equivalent to subscribe, publish, or subscribe and publish.
4. In the Users and Roles list, click the user for which you want to add permissions.
5. In the Edit User dialog, click **Advanced Mode**.
6. Click the **+** icon to open the Add Permissions panel.
7. Click **MQTT**.
8. In the Topic field, enter `clients/#`. This gives the selected user access to the `clients` topic. The wildcard `#` gives access to any topic that is hierarchically below `clients`. For example, `clients/status/active`.
9. Click **Add**.
10. Click **Update**.
### Self-Registration via the Client Registry
The second way of creating credentials for a user is self-registration via the [Client Registry](https://docs.cybus.io/2-0-6/documentation/client-registry).
There are two [self-registration methods](https://docs.cybus.io/2-0-6/documentation/client-registry#self-registration-methods):
* Self-Registering Clients via REST API
* Self-Registering MQTT Clients
In this guide, we focus on self-registering MQTT clients:
1. Activate the self-registration: In the Connectware Admin UI, select **User > Client Registry**, and click **Unlock**. This will temporarily unlock the self-registration for clients.
2. Now, the client must try to connect to Connectware with a username that does not yet exist. We utilize the `mosquitto_sub` client for this with the following command:
{% code lineNumbers="true" %}
```sh
mosquitto_sub -h localhost -p 1883 -u Mosquitto -P 123456 -t clients
```
{% endcode %}
Assuming we are running Connectware on our local machine and want to register the user `Mosquitto` with the password `123456`. The topic we chose using option `-t` is not relevant; this option is just required for issuing the command. We will explain this command in detail in the section about subscribing to data.
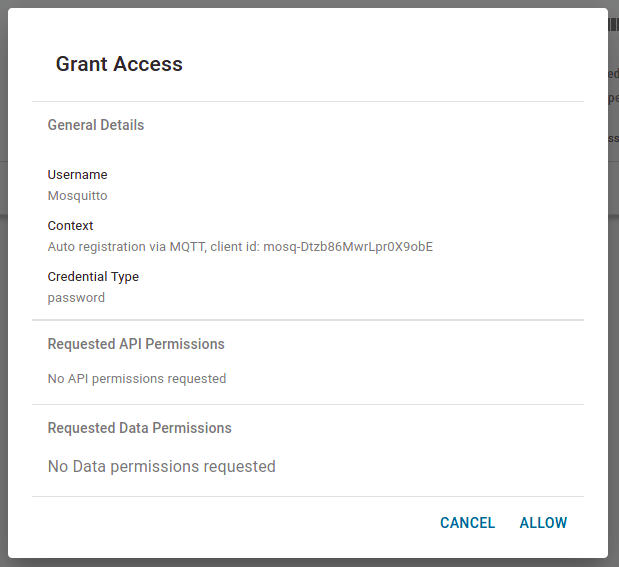
3. Shortly after we have issued this command and it exited with the message: **Connection error: Connection Refused: not authorized.**, we can look at the Client Registry in the Admin UI and see the connection attempt of our Mosquitto client.
4. In the client list, click an entry to open the **Grant Access** dialog. This summarizes the details of the request and the permissions requested. You can only request permissions using the self-registration via REST API.
5. To grant access to this client and create a user, click **Allow**.
6. On the navigation bar, click **User** to see the newly created user `Mosquitto`. Since we are using the MQTT client self-registration, we now need to manually add permissions to the accessible topics.
## Connecting Your Client
We are now ready to connect our clients to Connectware via MQTT.
### Mosquitto
We already made use of the client functions of Mosquitto by utilizing it for our self-registration example. That also suggested that we do not explicitly need to establish a connection before subscribing or publishing. This process is included in the `mosquitto_sub` and `mosquitto_pub` commands and we supply the credentials while issuing.
### MQTT Explorer
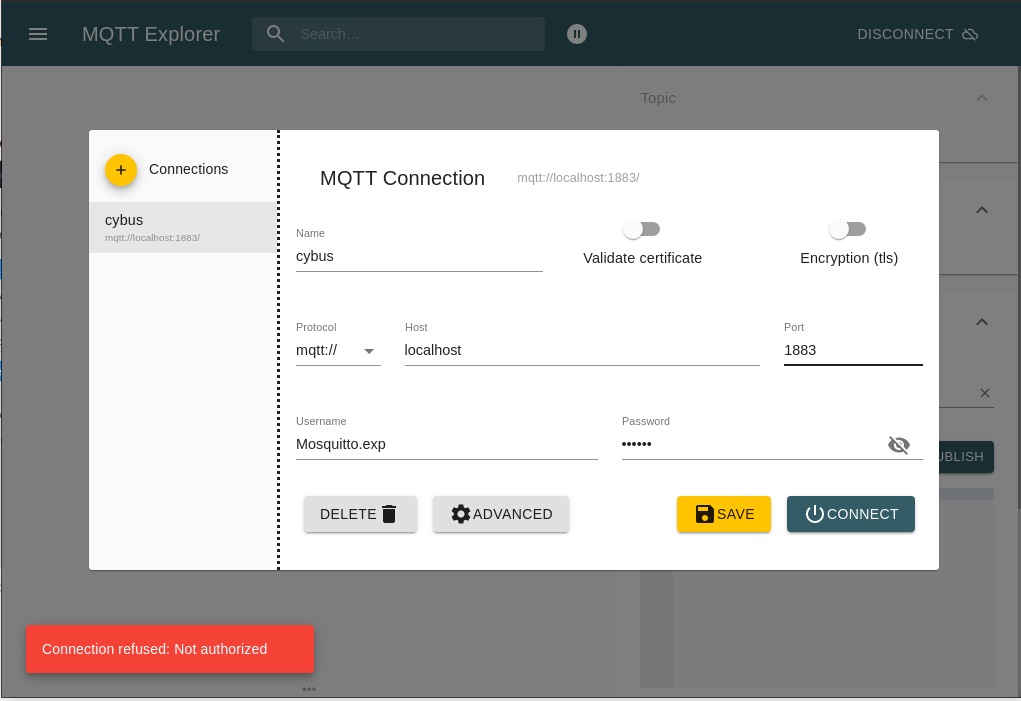
Using MQTT Explorer, we need to configure the connection.
1. Click **+** to add a new connection.
2. Name the new profile `cybus` and define the host as `localhost`. Set Host to Connectware address.
3. Fill out the user credentials.
4. Perform client registry since it is another client.
### Workbench
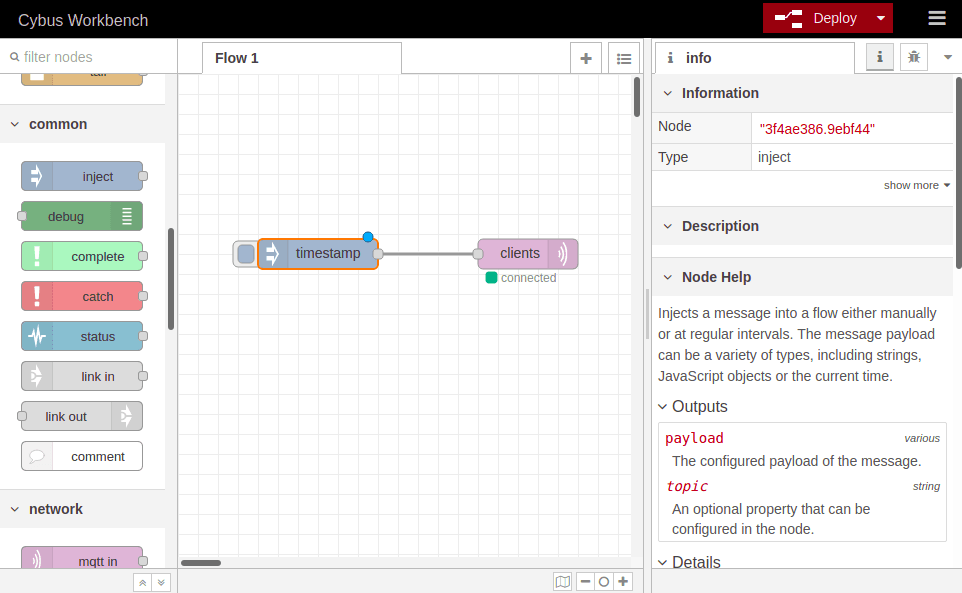
You can access the Workbench via the Admin UI by clicking **Workbench** in the navigation bar. A new tab will open showing the most recently edited flow of our Workbench. If it is empty you can use this; otherwise, click the **+** button to the upper right of the currently displayed flow. If you are new to the Workbench, we will not go into details about the functions and concepts in this guide, but it will demonstrate the simplest way of monitoring data with it.
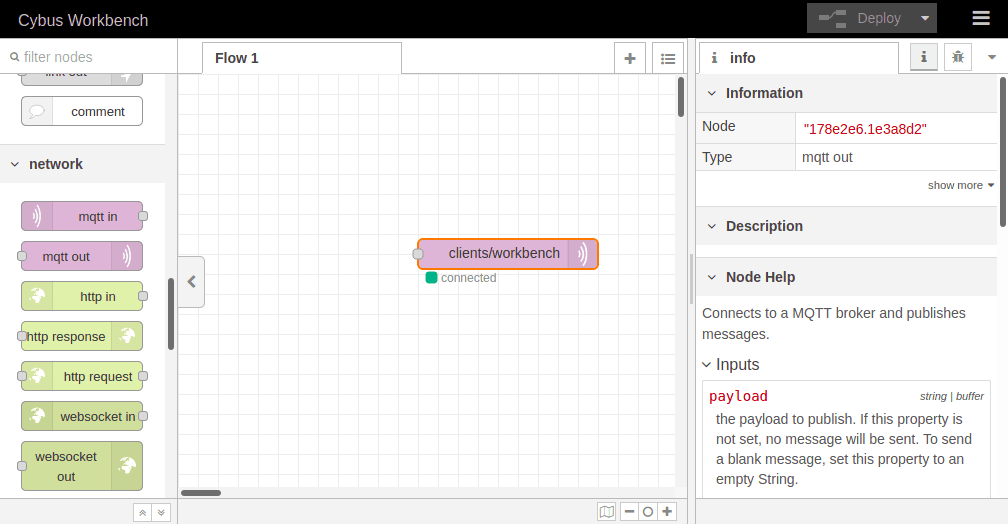
Take a look at the left bar: There you see the inventory of available nodes. Scrolling down you will find the section **network** containing two MQTT nodes among others. The so-called `mqtt in` and `mqtt out` nodes represent the subscribe and publish operations. Drag the `mqtt out` node and drop it on your flow. Double-clicking it will show you its properties. The drop-down menu of the **Server** property will allow you to add a new MQTT broker by clicking the pencil symbol next to it.
We name this new connection `cybus` and define the server address as `connectware`. This is the way to address the local running Connectware; you will not be able to access it using `localhost`! Now switch to the **Security** tab and fill in the username and password. Save your changes by clicking **Add** in the upper right corner. Make sure the just-created configuration is active for the **Server** property. For the property **Topic**, we choose the topic we selected for our clients: `clients/workbench`. The other properties will keep their default settings. Click **Done** in the upper right corner.
To apply the changes, click the button **Deploy** in the upper right corner. This will reset our flow and start it with the latest settings. You will now see that the MQTT node is displayed as `connected`, assuming everything was configured correctly.
We successfully established a connection between the Workbench and our Connectware.
## Publishing Data
Publishing data allows us to make it available. It does not necessarily mean that someone is receiving it, but anyone with the permission to subscribe to the concerning topic could.
### Mosquitto
Using Mosquitto, publishing data can be achieved by a single command line utilizing `mosquitto_pub`. For this example, we want to connect to Connectware using the following options:
* Host to connect to: `-h localhost`
* Port to connect to: `-p 1883`
* Username: `-u Mosquitto`
* Password: `-P 123456`
* Topic to publish on: `-t clients/mosquitto`
* Message: `-m "Hello World"`
{% code lineNumbers="true" %}
```sh
mosquitto_pub -h localhost -p 1883 -u Mosquitto -P 123456 -t clients/mosquitto -m "Hello World"
```
{% endcode %}
If successful, the command will complete without any feedback message. We could not confirm yet if our message arrived where we expected it. But we will validate this later when coming to subscribing to data.
### MQTT.fx
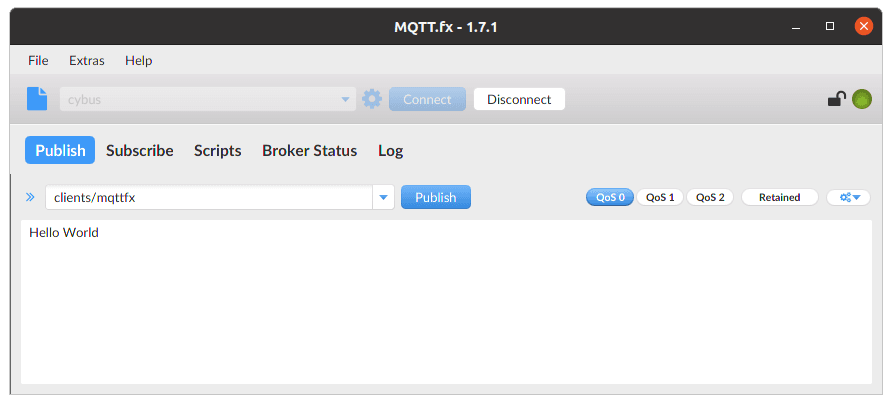
Publishing with MQTT.fx is even simpler once the connection is configured and a connection is established (indicated by the gray/green circle in the upper right corner). If the indicator shows green, we are connected and ready to publish some messages.
Switch to the **Publish** section. In the input line next to the Publish button, you define the topic you want to publish to. We will go for the topic `clients/mqttfx`. Then you click the big, blank box below and type a message, e.g. `Hello World`. To publish this message, click **Publish**.
Again, we have no feedback if our message arrived, but we will take care of this in the Subscribing data section.
### Configure the Workbench as Data Source
We already added a publishing node to our flow when we established a connection to Connectware and configured it to publish on `clients/workbench`. Having this set, the Workbench is ready to publish, but the messages are still missing.
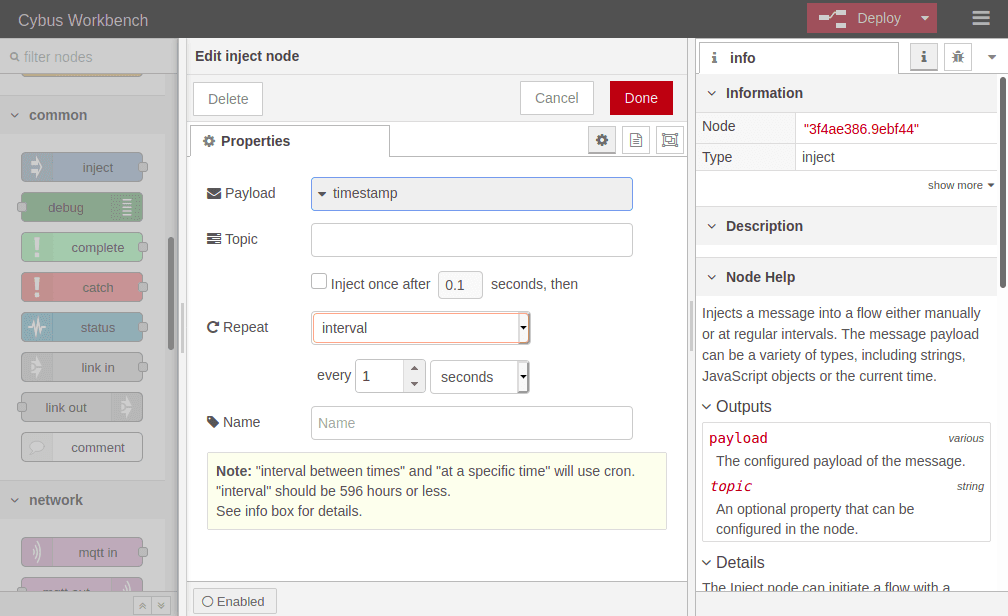
At this point, we want to create a data source in our flow which periodically publishes data through the `mqtt out` node. We drag an **inject** node from the nodes bar into our flow and drop it left to the `mqtt out` node. Now we can draw a connection from the small gray socket of one to the other node.
Double-clicking the inject node, which is now labeled `timestamp`, shows its properties. We can define the payload, but we will keep `timestamp`, declare a topic to publish to, which we leave blank because we defined the topic in our MQTT node, and we can set if and how often repeated the message should be injected in our flow. If we do not define repeating, a message will be injected only if we click the button on the left of the inject node in our flow.
We set repeating to an `interval` of every second and confirm the settings by clicking **Done** in the upper right corner. Now we have to **Deploy** again to apply our changes. We still have no confirmation that everything works out, but we are confident enough to go on and finally subscribe to the data we are generating.
## Subscribing Data
Subscribing to data means that the client will be provided with new data by the broker as soon as it is available. Still, we do not have a direct connection to the publisher; the broker is managing the data flow.
### Mosquitto
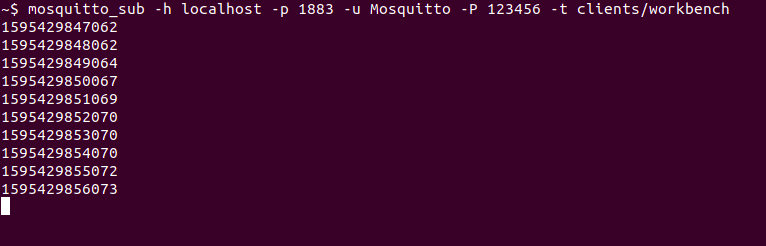
We already used `mosquitto_sub` to self-register our client as a user. We could have also used `mosquitto_pub` for this, but now we want to make use of the original purpose of `mosquitto_sub`: Subscribing to an MQTT broker. Not any broker, but the broker of our Connectware.
We are using the following options:
* Host to connect to: `-h localhost`
* Port to connect to: `-p 1883`
* Username: `-u Mosquitto`
* Password: `-P 123456`
* Topic: `-t clients/workbench`
{% code lineNumbers="true" %}
```sh
mosquitto_sub -h localhost -p 1883 -u Mosquitto -P 123456 -t clients/workbench
```
{% endcode %}
Again, make sure that you have specified the address of your Connectware as host, which does not necessarily have to be your local machine! We will subscribe to the topic `clients/workbench` where we are publishing the messages from our Workbench.
**Result**: The Mosquitto client now shows us every new message published on this topic. In this case, the timestamps generated by our Workbench.
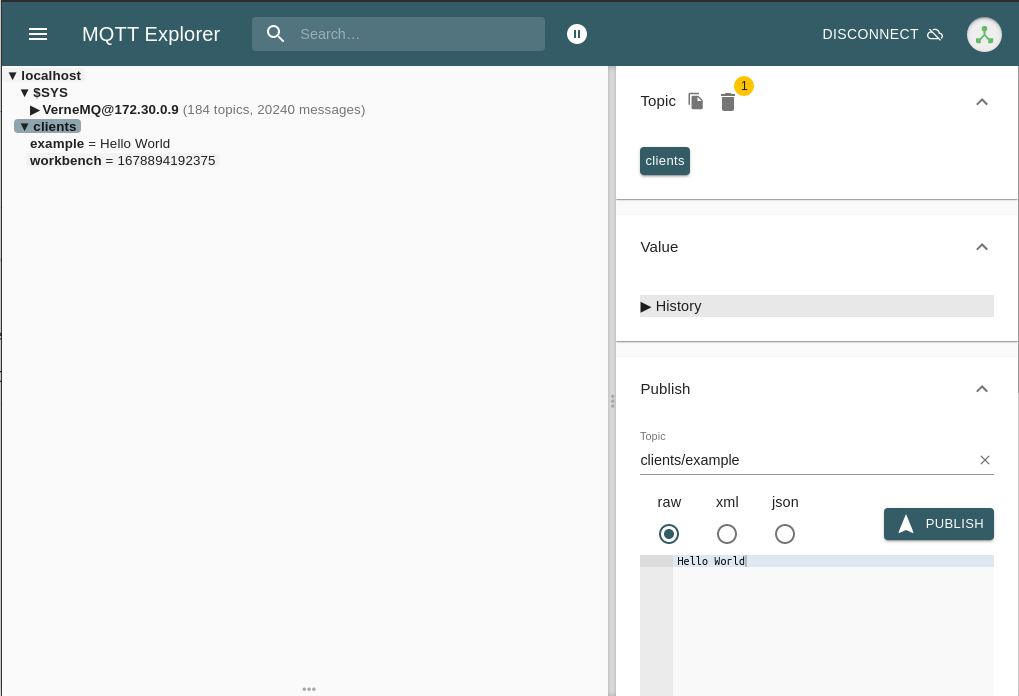
### MQTT Explorer
Already having the connection to our Connectware established, it is easy to subscribe to a topic. On the left side under localhost, we can see the messages coming:
And there you see finely presented all the data flowing in. You can also add more topics to be monitored simultaneously and manage which should be presented to you or be dumped in a file.
### Workbench
Eventually, we will utilize the Workbench to monitor our data. But why just monitor it? The Workbench has a lot more to offer and exploring it will quickly give you a hint about the possibilities that lie ahead. But we will focus on that in another guide.
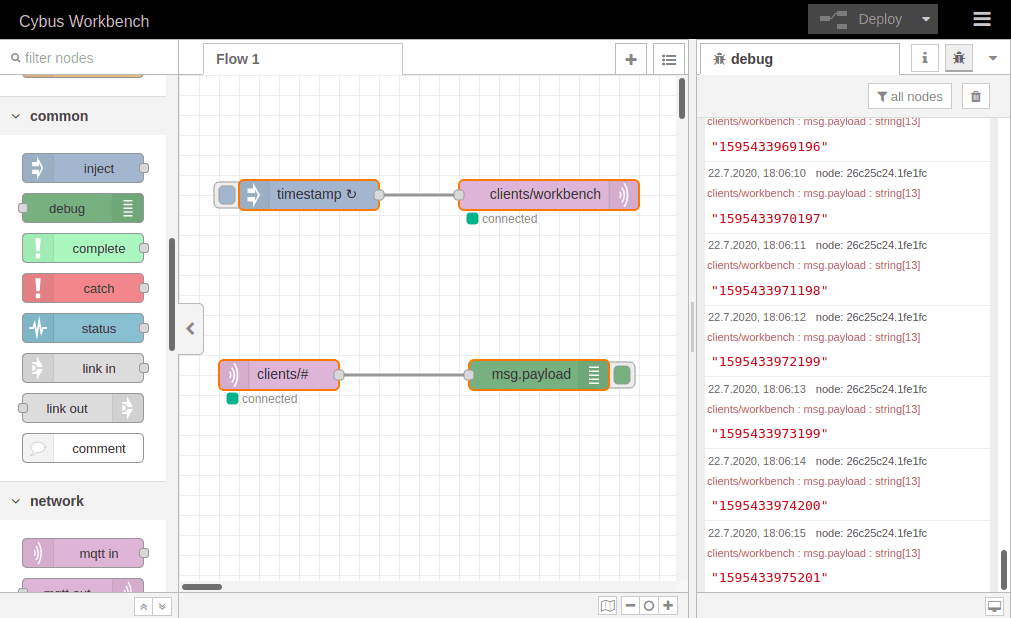
At first, we add an `mqtt in` node to the flow where we already created the data generator. Double-clicking it, we choose the previously configured server `cybus` and the topic `clients/#`. The wildcard `#` defines that we subscribe to every topic under `clients`. Be careful using wildcards since you could accidentally subscribe to a lot of topics which could possibly cause very much traffic and a message output causing a confusing mixture of data from all topics. Confirm the node properties by clicking **Done** and add a **debug** node to the flow. Draw a connection from the `mqtt in` to the `debug` node and **Deploy** the flow.
Click the bug symbol in the upper right corner of the information bar on the right. We see there are already messages coming in: They are the timestamp messages created in the very same flow but taking a detour via the MQTT broker before appearing in the debug window. They are messing up the show so let us just cut the connection between the `timestamp` node and the publish node by selecting the connection line and pressing Del and **Deploy** the flow one more time.
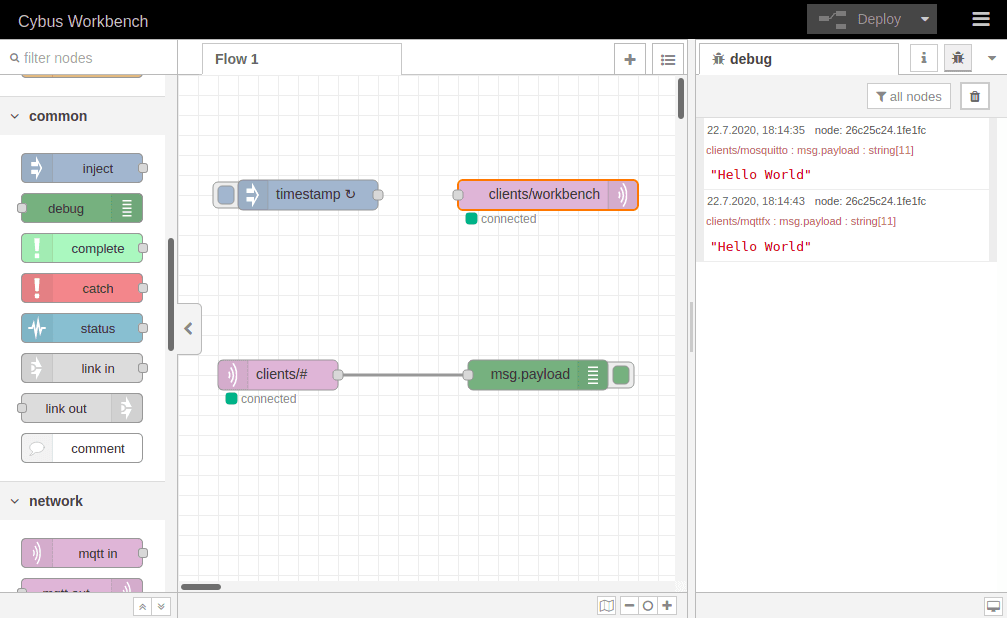
Now that we have restored the quiet, let us finally validate if publishing with `mosquitto_pub` and MQTT.fx even works out. So issue the `mosquitto_pub` command again and also open MQTT.fx and publish a message like we did in the section before.
**Result**: We can see two `Hello World` messages in our debug window and looking at the topics they were published on (written small in red right above the message text) we learn that one came from Mosquitto and the other from MQTT.fx.
## Summary
You’ve learned how to:
* Create credentials (manual and self-registration)
* Connect different MQTT clients to Connectware
* Publish and subscribe to topics
Next, explore advanced Workbench flows, payload transformations, and dashboard creation.