Agents
Agents are additional components of Connectware that can be deployed and started individually, usually somewhere outside of the central Connectware installation.
Agents are the solution to the requirement for “computing on the edge”. They allow data-processing at a very early stage of the pipeline and will secure non-secure hardware communication protocols right at the machine. Additionally, agents can be used to partition workloads of protocol translations, preprocessing, or data forwarding across multiple container instances.
For agents to work only a single pre-condition must be met: agents must be in a network that allows them to connect to the (central) Connectware instance.
Note
Agents solely use MQTT for communication and hence act as network clients. They do not require any inbound traffic and no special network configuration for inbound connectivity is needed.
This page describes how to run individual agent instances outside of the central Connectware, although any of those deployment possibilities can also be applied inside the central Connectware as well. Both is possible. The following documentation will focus on the docker-based agent setup.
Installation
To run an agent, one single Docker container has to be started. The container image to be used is identical to the Connectware’s protocol-mapper image. The image tag (i.e. the version) of that container must be the exact same version as the Connectware, otherwise the agent cannot start to communicate with the Connectware. In the examples below the image tag (version) is stored as IMAGE_TAG= 1.7.2
Orchestration
Starting the container is accomplished by the chosen orchestration tool. The
container can be started either by executing a docker run command, or by
using docker-compose with a corresponding docker-compose.yml file, or by
creating a deployment in a Kubernetes cluster, see examples below.
In either case the agent must be configured through environment variables made available to the container.
The following environment variables are required:
CYBUS_AGENT_MODE=distributed(switches protocol-mapper to run in agent mode)CYBUS_AGENT_NAME=<agentName>(unique name identifying this agent instance)CYBUS_MQTT_HOST=<connectwareHost>(the IP/hostname of Connectware)
The following environment variables are optional:
CYBUS_MQTT_USERNAME=<userName>Username for authentication in Connectware (default is<agentName>)CYBUS_MQTT_SCHEME=<scheme>(mqttsormqtt, default:mqtt)CYBUS_MQTT_PORT=<port>(default:1883)
Additionally, it is recommended to persist the data (credentials) of the agent, guaranteeing unsupervised and automatic availability, even after power cycles. To achieve this persistency, a docker volume mount must be added for the container. The volume must be mounted to /data in the container. The agent will automatically store the credentials on that volume and re-use them on subsequent start-up.
Note: If multiple agents will be run on the same computer, each agent must use its own volume mount, as otherwise agents would overwrite each other’s data, including username and password credentials.
As an alternative to locally generated credentials, it is also possible to
specify a password for this protocol-mapper agent directly by an additional
environment variable CYBUS_PROTOCOL_MAPPER_PASSWORD. This might be useful in
scenarios where the agent deployment is controlled by the same orchestration
tool as the central Connectware instance. In most other cases it is recommended
to let the agent generate local credentials, stored in a volume, and authorized
to Connectware through the client registration workflow.
It may also be useful to set the hostname property of the docker container
to the local host’s hostname, because this name will be displayed in the
Admin-UI overview page. If it is not set, the
local docker container ID will be displayed instead (e.g. d172c8c3667b),
which might look rather confusing in this overview page. Depending on the
operating system, the suitable value for the hostname may be available as an
environment variable ${HOSTNAME} or it must be specified manually, as noted
in the example below.
Agents use an unprivileged user by default. Some protocols or features need root permissions (for example USB access or promiscuous network mode). If you want to use a feature that requires root access, you simply need to execute the agent as user root.
In case of mutual TLS, first you need to enable it for the Broker:
CYBUS_BROKER_USE_MUTUAL_TLS="yes"(default:no)
Some additional configuration is necessary on the agent:
CYBUS_MQTT_SCHEMEshould be set tomqttsCYBUS_MQTT_PORTshould target the appropriate port of the Broker, which listens for mqtts messages on8883by defaultUSE_MUTUAL_TLS=true(default:false)- You should mount your certificates as regular volumes. By default Connectware will look for the certifcates specified in these environment variables:
AGENT_KEY=<key>(default:/connectware/certs/client/tls.key)AGENT_CERT=<cert>(default:/connectware/certs/client/tls.crt)CA=<caChain>(default:/connectware/certs/ca/ca-chain.pem)
Example 1: docker-compose
version: '2.0'
services:
  protocol-mapper-agent:
    image: registry.cybus.io/cybus/protocol-mapper:${IMAGE_TAG}
    environment:
      CYBUS_AGENT_MODE: distributed
      CYBUS_AGENT_NAME: myAgent
      CYBUS_MQTT_HOST: 10.11.12.13
    volumes:
      - protocol-mapper-agent:/data
    restart: unless-stopped
    network_mode: host
    hostname: <some-suitable-hostname>
volumes:
  protocol-mapper-agent:
To start, create a new directory (e.g. myAgent). Inside, create a new file
called docker-compose.yml with the above content and finally run:
docker-compose up -d
Again it is noted that if multiple agents should run on the same computer, each agent must have defined its own docker volume, otherwise different agents would overwrite each other’s persisted data, including username and password credentials.
To execute the agent with root permission add user: root to the docker compose service:
version: '2.0'
services:
  protocol-mapper-agent:
    user: root
    image: registry.cybus.io/cybus/protocol-mapper:${IMAGE_TAG}
    [...]
Example 2: docker run
Using the environment variable IMAGE_TAG= 1.7.2, the following command will run the agent directly (but with the comment lines removed):
# The docker run command
docker run \
    # Make it run as an agent
  -e CYBUS_AGENT_MODE=distributed \
    # Set the name of the agent. This must match the agentName used in the commissioning file.
  -e CYBUS_AGENT_NAME=myAgent \
    # The IP address where Connectware is running.
  -e CYBUS_MQTT_HOST=10.11.12.13 \
    # Attach a volume so the agent can store data across restarts
  -v /tmp/cybus:/data \
    # Upon failures, restart the container
  --restart unless-stopped \
    # Run it in host mode networking
  --net=host \
    # Some suitable hostname of the container.
  --hostname=${HOSTNAME} \
    # The image to use
  registry.cybus.io/cybus/protocol-mapper:${IMAGE_TAG}
This will start an agent named myAgent that persists data to /tmp/cybus
on the host OS.
To execute the agent with root permission add --user=root to the parameters of the docker run command.
Example 3: Kubernetes
Note
To run Connectware agents on Kubernetes we recommend to use our connectware-agent Helm chart.
Learn how to use it in this Cybus
Learn article.
If you prefer manual orchestration over using the Helm chart, you can use the following yaml manifest file, to run an agent on a Kubernetes cluster. You only need to configure the same parameters used by the others types of deployments.
This example only stores the agent data using an emptyDir. Replace this with a persistent volume for production use.
Additionally you will need to create a Kubernetes secret to store the Cybus
registry credentials needed to fetch the Connectware container images. To create a secret like this, use the secret name cybus-docker-registry with the following command:
kubectl create secret docker-registry cybus-docker-registry \
        --docker-server=registry.cybus.io \
        --docker-username=john.doe \
        --docker-password=abcd123 \
        --docker-email=john.doe@example.org
The username and password should be your Cybus Portal username and password.
Alternatively, when using the Connectware license key, the username is license and the
password is your Connectware license key.
The manifest file can be created from this example:
 1apiVersion: apps/v1
 2kind: Deployment
 3metadata:
 4  # The id for this kubernetes object
 5  name: connectware-agent-deployment
 6  labels:
 7    # Attach labels for easy group selection
 8    app: protocol-mapper-agent
 9spec:
10  replicas: 1
11  selector:
12    matchLabels:
13      app: protocol-mapper-agent
14  template:
15    metadata:
16      labels:
17        app: protocol-mapper-agent
18    spec:
19      # Configure volumes used by the agent to store data across restarts
20      volumes:
21      - name: agent-data-volume
22        emptyDir: {}
23      containers:
24        - name: protocol-mapper-agent
25          # Container image. Watch out: Must use identical version tag to current Connectware version!
26          image: registry.cybus.io/cybus/protocol-mapper:1.0.32
27          env:
28            # Make the protocol-mapper runs as an agent
29          - name: CYBUS_AGENT_MODE
30            value: "distributed"
31            # Set the name of the agent. This must match the agentName used in the commissioning file.
32          - name: CYBUS_AGENT_NAME
33            value: "myAgent"
34            # The IP address or hostname where the Connectware is running
35          - name: CYBUS_MQTT_HOST
36            value: "10.11.12.13"
37          ports:
38          # Expose the ports used by the agent.
39          - containerPort: 443
40          # Configure mount points
41          volumeMounts:
42          - mountPath: /data
43            name: agent-data-volume
44          # Configure resource limits
45          resources:
46            limits:
47              cpu: 4000m
48              memory: 4Gi
49      # Kubernetes secret used to pull the images from the Cybus registry
50      imagePullSecrets:
51        - name: cybus-docker-registry
Manifest file for download: agent-deployment.yaml
Example 4: Mutual TLS Agent
version: '2.0'
services:
  protocol-mapper-agent:
    image: registry.cybus.io/cybus/protocol-mapper:${IMAGE_TAG}
    environment:
      CYBUS_AGENT_MODE: distributed
      CYBUS_AGENT_NAME: myAgent
      CYBUS_MQTT_SCHEME: mqtts
      CYBUS_MQTT_HOST: 10.11.12.13
      CYBUS_MQTT_PORT: '8883'
      USE_MUTUAL_TLS: true
    volumes:
      - protocol-mapper-agent:/data
      - /mycerts:/connectware/certs/client
      - /myca:/connectware/certs/ca
    restart: unless-stopped
    network_mode: host
    hostname: <some-suitable-hostname>
volumes:
  protocol-mapper-agent:
Network Requirements
For the configured agent container, no incoming TCP/IP port permissions are needed. All communication will be handled by outgoing connections.
In order for the agent container to reach the central Connectware, the following incoming TCP/IP ports are needed for the central Connectware. In other words, the agent must be able to initiate connections to the central Connectware via the following ports:
443/tcp (https), and
1883/tcp (mqtt) or 8883/tcp (mqtts), whichever is chosen in CYBUS_MQTT_SCHEME
Registration
Registration describes the process of authorizing an agent to connect to the Connectware.
In the recommended setup where the agent has persistency enabled (see above), this step is needed only once upon initial deployment. To be precise, this registration is needed only in one of these cases:
the agent is started the very first time, or
the persisted credentials got deleted, or
the agent could not login to Connectware with its cached credentials.
In all other cases the registration process is not needed and the agent will seamlessly start working with the persisted credential from the storage volume. (Again note: If multiple agents should run on the same computer, each agent must use its own volume mount, as otherwise agents would overwrite each other’s credentials.)
In the initial deployment, the registration is performed as follows: First the agent container must be started. Then, the console log output of the container should look as follows:
{"level":30,"time":1590665714502,"msg":"Starting in distributed (edge) mode","pid":6,"hostname":"someHost","v":1}
{"level":30,"time":1590665714568,"msg":"Asking for Connectware registration at 1.2.3.4 with newly generated credentials...","pid":6,"hostname":"someHost","v":1}
{"level":30,"time":1590665714568,"msg":"The registration process must be finished using the web-interface.","pid":6,"hostname":"someHost","v":1}
{"level":30,"time":1590665714568,"msg":"Navigate to \"User Management -> Client Registry\", click unlock and authorize this client.","pid":6,"hostname":"someHost","v":1}
{"level":30,"time":1590665714568,"msg":"Username: cybus-sample-agent, pairing ID (should match in UI): a82123","pid":6,"hostname":"someHost","v":1}
If there is instead a message mentioning 409 Conflict, there is a
registration conflict existing that needs to be resolved, see
User Registration Conflict below.
To finalize the registration process, log into the Connectware Admin-UI and authorize the client as described in the chapter Client Registry.
Note
In addition to the agent name, you can also compare the Pairing ID to
verify that you are granting access to the correct agent instance.
Usage
Agents are able to provide three resource types:
The endpoint resource can also use the rules property to enable direct
data-manipulation and pre-processing on the edge using the rule engine (edge processing).
In order to start such resources on the agent, you must set the agentName
property at each Connection in your commissioning file. All Endpoint
resources using that connection will automatically also run on the the same
agent as well without setting any further properties.
Important
The value of the agentName property (as available for
Cybus::Connection resources) must match exactly the value of the
CYBUS_AGENT_NAME environment variable used during agent startup.
You can find an example commissioning file here.
Troubleshooting
As for docker logs (also see below): The logs can not be accessed from within Connectware. Instead, the logs must be collected and made accessible by the orchestration tool.
Connection Loss
If there is a connection loss between agent and central Connectware, the data connectivity is broken and messages will be lost. In particular, due to the resource management system, any connection from the agent to a machine will stop receiving data as long as the connection to the central Connectware is broken.
Nevertheless, short-term temporary connection outages (such as less than a few
seconds) can be covered by using the MQTT QoS (quality of service) level. This
QoS level must be set on a per-endpoint basis, because it must be set for each
published package and for each subscription individually. To set this for the
MQTT connection from the agent to the central Connectware, set the qos
property of each involved Endpoint to the value 1 (one)
instead of zero. (QoS level 2 is most likely not useful in the industry context
and is not recommended here.) Setting a non-zero QoS level will ensure that no
in-flight MQTT message is getting lost if there is a temporary network outage.
However, as soon as the MQTT connection loss between agent and Connectware gets noticed by the agent, it will stop receiving data from the machine, and the Connectware in turn will mark the respective resources as deviated.
If you are interested in how to set up different solutions for a distributed data collection system that could also tolerate temporary network fragmentation, please contact our support team at support@cybus.io.
User Registration Conflict
If the user registration as described above is not accepted by Connectware
but lets the agent print a log message 409 Conflict, most likely there is
already an existing user with the given agent name in Connectware, but with
a different password. The easiest solution is to go to the “User Management”
page in the Admin-UI and delete that particular user, see
Deleting Users.
The full message at the agent’s log in such cases is the following:
{"level":30,"time":1590665714502,"msg":"Failed to register agent. Response: 409 Conflict. A conflicting registration might be pending, or a user with the same username myAgent is already existing (which you must delete first)."}
Monitoring
Status
The connectivity status of the agents can be monitored by navigating to System
> System Status > Agents in the UI.
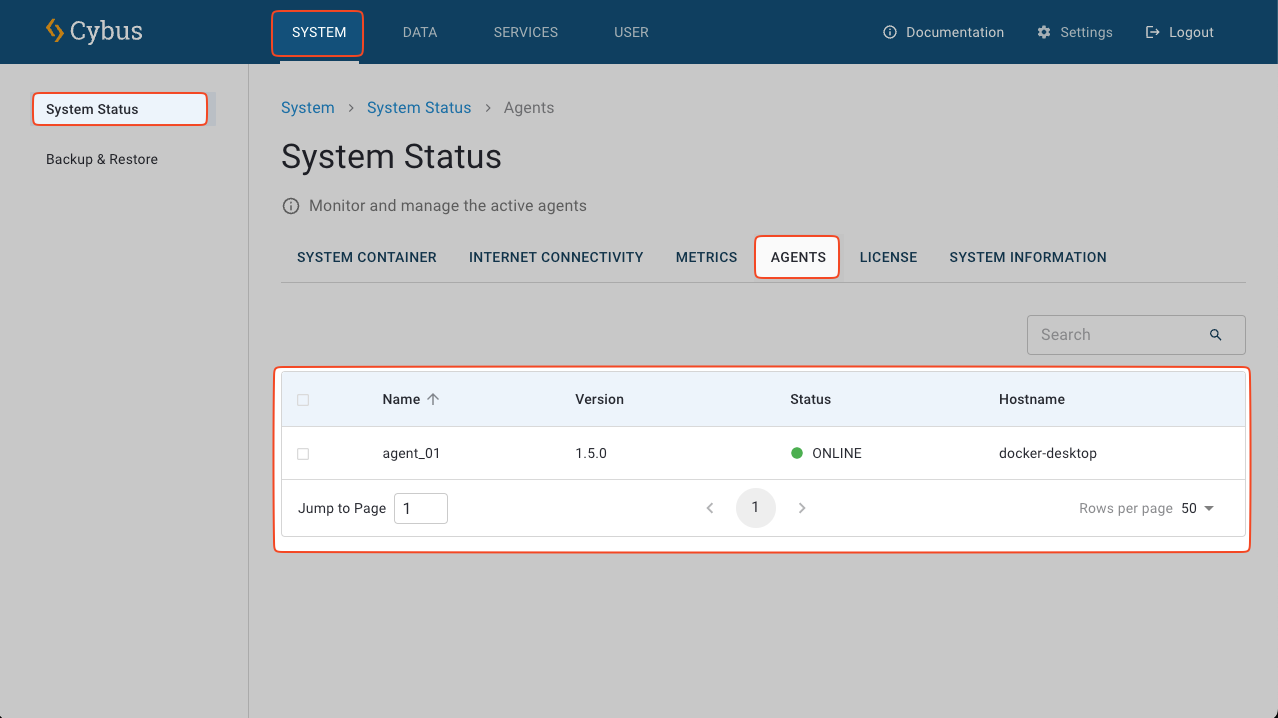
In the table of currently known agents, for each agent the current status (online / offline) is shown, as well as the version number of this particular agent container, and the hostname as configured when starting the agent container.
Agents in offline status can be removed from this list by pressing the
Delete icon in the upper right corner after selecting that row in the table.
Note: This merely removes the agent from the list, but it does not remove a
registered user from the user database! To remove a registered agent user from
the user database, go to the “User Management” page in the Admin-UI and delete
that particular user, see Deleting Users.
Docker Logs
The docker logs (or: debug output) of the agent containers can not be monitored from within Connectware. Instead, those logs need to be monitored by the chosen orchestration tool (above) that is also responsible for the container deployment.